
How to paint a jellyfish in watercolours
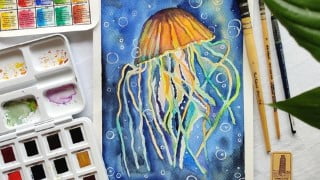

Learn how to draw and paint jellyfish in watercolors with this comprehensive course. From drawing techniques to applying masking fluid and creating beautiful washes, you’ll master the art of capturing jellyfish in stunning detail. Perfect for nature and seascape enthusiasts who love painting with watercolors.
What you’ll learn
- will learn how to draw the jellyfish in pencil
- will learn how to apply the masking fluid
- will learn how to use wet-on-wet technique to create an entire watercolours
- will learn how to work on details with wet-on-dry technique
During this class you will learn how to draw and paint jellyfish in watercolours. Here you will learn some drawing skills, how to apply fluid mask, how to apply wet-on-wet wash and then how to paint jellyfish in detail.
On this class you will learn:
– how to draw the jellyfish in pencil – this step is important as it will guide you throughout the whole process from applying fluid mask, till painting water and then the jellyfish itself
– how to apply the masking fluid, and why we use it in our works – Reserving fluid is a kind of rubber glue that can be used to cover individual parts of the paper. This layer will keep the surface free of paint, even if you paint with a lot of water. Masking fluid can be used when you need a clear boundary between the background and elements on it, or when you need to place small light details on a dark or colored background.
Since the masking fluid resembles a rubber glue in its texture, it sticks together the pile. I advise you to moisten the brush before starting work and run it several times over the bar of soap so that it forms a protective layer. After that, you can safely get to work! Remember to rinse your brush with warm water immediately after use. Another important point! Make sure your masking fluid is completely dry before you paint over watercolors. However, it is necessary to remove its layer only after the watercolor is completely dry.
– how to apply the first washes with wet-on-wet technique – The “wet” technique, as a rule, involves working in one session, and if you work for several days, then each time you need to wet the sheet again. Glazing allows you to continue painting with watercolors without preparatory work.
– how to work on details with wet-on-dry technique to catch up the viewer eyes – Glazing allows you to make the colors deeper, as the watercolor lightens by several tones when it dries. It is important to remember that a new layer of paint should be applied only after the previous one has completely dried. Glazing makes the image more realistic due to the ability to work out the nuances of lighting and volume transfer.
You will have to follow me along all these videos and to create your own masterpiece.
For the drawing you will need a pencil with the hardness B or HB, and a kneadable art eraser. Try not to leave strong lines, as water and watercolours work as fixative, and will be difficult to erase the lines after you will paint.
In watercolours, if you do not have all 36 pans, use the colours you have. If you use any other blue colours as I mention, do not worry about. Try to experiment and follow along the techniques.
1. First step is about the drawing. You will have to draw the jellyfish with all its tentacles.
2. Then you will apply reserving fluid. It will help you to preserve the white spaces on the paper. Specifically for the tentacles that are thin and can easy be painted with the backgroud.
3. You will wet the work and will have to create the base colour quick, as only working quick you will get beautiful transitions of blue colour.
4. Once the work is dried, you will intensify the work with colour, as wet-on-wet technique leaves a lighter colour of watercolour once it dries.
5. You will have to remove the fluid mask and to start working on the jellyfish. Jellyfish is transparent itself, but due to this, it takes colours from the objects nearby and the light. This is why you will have to apply different warm and cool colours on it.
6. Last, but not least, you will have to adjust the details. Details are important as those catch up the viewer eyes. I use a jelly pen sakura, that helps me with bubbles, if you want you can work with tempera.
Just use the steps I explain during the work and enjoy the process. Good luck!
Who this course is for:
- everyone who loves nature and seascape
- everyone who enjoy painting in watercolours
User Reviews
Be the first to review “How to paint a jellyfish in watercolours”
You must be logged in to post a review.




There are no reviews yet.