Sew Sturdy: Travel Organizers
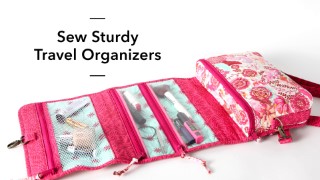
Sew two travel organizers that are functional, stylish and an impressive addition to your sewing repertoire!
Class Preview
Sew two travel organizers that are functional, stylish and an impressive addition to your sewing repertoire!
Introduction & Everything In Its Place Bag
Meet quilting instructor and pattern designer Annie Unrein as you’re introduced to the fun, fresh travel organizers you’ll create in this class. Learn how to select the best fabrics for the job before exploring the techniques you’ll use to work with various types of zippers, hardware, mesh, vinyl and more.
Preparing the Bag Components
Start putting your first bag together with Annie’s help along the way! You’ll make a stabilizer sleeve to prevent the fabric from puffing out when it’s carried and create a darling padded handle for your bag. You’ll also learn how to install zippers along the sides of the bag, and begin working on the creation of your mesh pockets.
Pocket Pages
Choose from one of Annie’s four pocket design variations (or make one of your own!) as you decide what you’ll be storing in each section of your bag. Next, Annie demonstrates installing zippers into your pockets, and helps you finish a “pocket page” of multiple zippered vinyl compartments that will keep all of your belongings in their proper places.
Finishing the Organizer Bag
Complete the organizer-style bag with Annie’s troubleshooting tips to help navigate tricky areas. You’ll learn how to make your own binding for your pocket pages, assemble each component of the bag and quickly attach sturdy zipper pulls. Customize the pocket layout to your liking before finishing this darling, sturdy bag!
Hanging Cosmetics Bag
Start a hanging cosmetic bag project as Annie guides you through techniques to create a handle and adjustable shoulder straps that can be shortened or lengthened to your liking. Next, you’ll hone your skills working with mesh and vinyl pockets before applying Annie’s zipper installation techniques to a curved edge. You’ll love working with a fun variety of mesh, vinyl and quilted pockets as you go!
Preparing the Bag Components
Start working on the outside of the bag as you attach hardware and the components that make up your handle and top strap. Once they’re securely in place, turn to the inside of the bag as you start adding your mesh, vinyl and quilted pockets. Annie shares helpful tips for securing, placing and sewing each component to help the construction process go by quickly and efficiently.
Finishing the Cosmetics Bag
Put the finishing touches on your cosmetics bag as you trim off excess fabric, apply binding to the edges and add fun embellishments like colorful zipper pulls to the pocket zippers. Finish by sewing and attaching the shoulder straps to the clasps, culminating in a chic, fully customized bag!
User Reviews
Be the first to review “Sew Sturdy: Travel Organizers”
You must be logged in to post a review.


There are no reviews yet.