A Guide To Atmospheric Watercolors: Wet-in-wet Landscapes

Learn how to create stunning atmospheric watercolor landscapes using wet-in-wet techniques. This course teaches you how to paint skies, mountains, trees, and more with minimal effort and brushstrokes. Discover the importance of planning and layering to add depth and detail to your paintings. Whether you’re a beginner or looking to improve your skills, this course is perfect for students learning watercolor painting in a loose style. Join now and unleash your creativity with wet-in-wet watercolors!
What you’ll learn
- How to paint simple, atmospheric paintings in watercolour
- How to sketch and plan your landscape painting in pencil before you start painting
- How and when to use wet-in-wet watercolour techniques to paint clouds, skies, mountains, grass and sand
- How to paint basic trees and rocks with minimal effort and brushstrokes
- How to add people into your landscape in a natural and simple way
- How to layer effectively to add extra details
- How to combine layers to create depth naturally
- How to paint simple shadows and identify or choose a light source in your painting
Welcome to A Guide To Atmospheric Watercolors: Wet-in-wet Landscapes
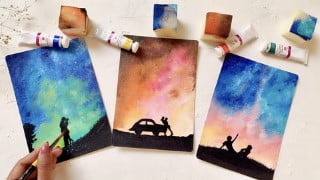
In this course, we’ll be painting two simplified landscapes using a variety of wet-in-wet techniques. Creating a soft and hazy look with a sense of depth can be tricky when you’re learning watercolours. Painting wet-in-wet is often associated with a loss of control. Without the right knowledge, you can create a mess!
But don’t worry, I’m going to show you the importance of timing when painting wet-in-wet. I’ll show you how to gain control, and layer effectively to create soft and atmospheric scenes. It’s easier than you think! Wet-in-wet techniques brings out the natural strengths of watercolour, and are essential for your watercolour journey.
In any painting, planning is crucial. I’ll show you how to simplify shapes and sketch in large shapes such as sky, buildings trees, grass and land. Getting those large components in accurately beforehand is essential for your painting to make sense.
In this course you’ll learn:
How to paint simple, atmospheric paintings in watercolour
How to sketch and plan your beach landscape painting in pencil before you start painting
How and when to use wet-in-wet watercolour techniques to paint clouds, skies, mountains, grass and sand
How to paint basic trees and rocks with minimal effort and brushstrokes
How to add people into your landscape in a natural and simple way
How to layer effectively to add extra details
How to combine layers to create depth naturally
How to paint simple shadows and identify or choose a light source in your painting
So join me in this course! I’m looking forward to showing you how to make wet-in-wet watercolour work to your advantage.
Assignment:
Your course project is to draw and paint your own wet-in-wet watercolour landscape! This can be a scene featured in this course or based on one of your own photographs or scenes you have observed outside.
You can also refer to the scanned drawing/painting templates attached below which will allow you to trace the drawing if you choose to do so. I recommend drawing each scene freehand. Drawing is an important step in improving your painting skills. This provides you with an opportunity to compose and plan your painting. Once you’ve finished the drawing, use the watercolor steps and processes included in the course demonstrations to complete your painting.
Materials:
Use any watercolour paints, pencil watercolour paper, and brushes you have available. I recommend
0.5mm mechanical pencil
Artist-grade watercolour paints – blue, yellow, and red
100% cotton watercolour paper or sketchbook
Watercolour Brushes – mop brush and a variety of round brushes for detailing.
Getting Started:
Review the course demonstration videos first. You can also download the tracing templates to transfer over your drawing if you wish.
Looking to sketch and paint another scene? Research some free reference photo websites, pick one of your own reference photos, or simply find an outdoor location where you can sit and paint. Using the steps and processes included in this course, create your own unique urban sketch.
Sharing Your Work:
Share your final paintings and progress shots with the course by uploading them to the Q&A or discussion section. If you have any questions or need more tips, please let me know. I’m happy to help.
Who this course is for:
- Students learning watercolor painting
- Students learning atmospheric watercolor painting techniques
- Students learning to paint in a loose style
User Reviews
Be the first to review “A Guide To Atmospheric Watercolors: Wet-in-wet Landscapes”
You must be logged in to post a review.


There are no reviews yet.