Fundamentals of Furniture Making
Tables, chairs and other forms of furniture rely heavily on mortise-and-tenon joinery, which is at the heart of this class with George Vondriska. From scaling the joinery to suit your project to…
Class Preview
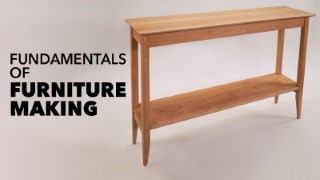
Tables, chairs and other forms of furniture rely heavily on mortise-and-tenon joinery, which is at the heart of this class with George Vondriska. From scaling the joinery to suit your project to producing a perfectly fitting joint, you’ll learn the mortise and tenon joint inside and out, along with other great tips for making rock-solid furniture.
Session 1: Getting Started
Meet your instructor, George Vondriska, and learn what tools and techniques he’ll use in class, as well as how many board feet of material are required for the woodworking project you’ll complete.
Session 2: Prepping Parts
George’s preference is to start furniture-making projects with the most visible piece. That means gluing up the top first. The legs are also made from glued-up stock using a book-matching technique that makes them seamless.
Session 3: Design and Layout Guidelines
The strength of mortise and tenon joinery begins with the joint being correctly sized for the project. Learn standard rules for dimensioning this joint that you can apply to this table and other woodworking projects. Consistency in laying out the joint locations is key to a square and stable project. George provides his time-tested secrets for uniform layout.
Session 4: Joinery
Mortises on the router table, and tenons on the table saw: This approach provides a winning combination for cutting the mortise and tenon joint. What if, once cut, the joint is too tight or too loose? No sweat. Everyone runs into an “oops” every once in a while, and George will provide the fix for you.
Session 5: The Top
Solid wood tops must be allowed to seasonally expand and contract. This can be accomplished by incorporating tabletop fasteners in your project; a must to prevent splitting later. Learn about correctly installing these versatile fasteners. A great tip for making a thick top appear lighter is undercutting the edge. A shop-made jig provides what you need to make this cut on the table saw.
Session 6: Details
You’ll be amazed at how a simple router bit can transform the look of the rails on your furniture projects. Easy to set up on the router table, this cutter adds detail that really enhances the overall design of the table.
Session 7: Taper the Legs
Lighten the look of your furniture by using a tapered rather than straight leg. Learn the rules of thumb for how to lay out an attractive taper, and how to make a custom table saw jig for safely and accurately cutting the taper.
Session 8: Sand and Assemble
Many furniture projects are too complex to assemble all at once. Ease of assembly is about staging, and considering which parts to assemble first. George provides the guidance you need to determine a logical assembly sequence. He also provides tips on making sure the project is square.
Session 9: Summary
George wraps up this class with a reminder to use the processes and skills you learned in making this project table to create a wide variety of new furniture pieces that you’ll enjoy for years.
Bonus: Instructor Insights
Learn more about the class and learn some history of George’s furniture making.
Meet Your Expert
Learn how George got started in woodworking and about his experience as an instructor.
User Reviews
Be the first to review “Fundamentals of Furniture Making”
You must be logged in to post a review.


There are no reviews yet.