
How To Draw A Realistic Cat Eye In Colored Pencil
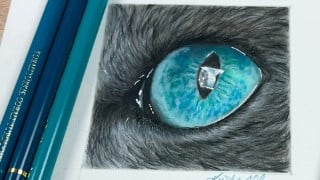

Learn how to create realistic fur texture and a shiny surface in this course for beginner to intermediate colored pencil artists. Follow step-by-step instructions to transfer your reference photo, apply layers of color, and add highlights and shadows. Supplies needed include Fabriano Artistico paper, graphite stick, mineral spirits, and various colored pencils. Enhance your skills and create a beautiful blue/green cat eye.
What you’ll learn
- How to create realistic fur texture
- Proper Layering techniques to achieve a realistic result
- How to create a shiny or glassy surface
- Using various detailing and highlighting methods
Our Project for The Course is a Blue/Green Beautiful Cat Eye!
I printed my reference photo in a 3 X 3 size. The Reference Photo is attached below.
The Course is broken down into 7 sections
1. Transferring The Sketch – How to accurately transfer your reference photo using graphite.
2. Applying First Layers Of Color – We will build the foundation to work from by applying very light layers of the mid tones.
3. Building Color Saturation In The Eye – Slowly we will increase layers of the mid tone colors and start to separate the darker shadowed areas.
4. Starting The Base Layers Of Fur – We will start building a foundation of texture for the fur by using the black pencil for the darker groupings of fur then add in lots of fur strokes with the mid tone greys.
5. Final Layers Of Color In The Eye – Now we are getting to the point where we can apply more pressure and saturate the eye to create the values and contrast.
6. Creating Texture and Depth In The Fur – At this point we are really diving into the value and making sure we have our darks and lights in. Then we will use a Slice tool (or Xacto knife) to create tiny fine lines to increase the appearance of texture and create some highlights.
7. Highlights and Shadows – Now we are at the fun part! We will use the white pencil and a white paint marker to get the glossy highlights in the eye and around the lids. Then, by using the black pencil we will go around the whole drawing and saturate the darkest areas to finalize the drawing.
Supplies:
Fabriano Artistico 140lb Hotpress Paper
Putty Eraser
Graphite Stick (any graphite pencil)
Odorless Mineral Spirits/Solvent
Taklon Brush to Blend
Slice Tool or Xacto Knife (optional)
Uni-posca White Paint Marker (Or any White Paint Pen/Marker you have will do just fine!)
Polychromos Pencils:
Black
Cold Grey III
Light Cobalt Turquoise
Bluish Turquoise
Deep Cobalt Green
Cold Grey V
Indigo Blue
Cobalt Green
Cobalt Turquoise
Warm Grey VI
Cold Grey II
Dark Sepia
Light Pthalo Green
Helio Turquoise
Prismacolor Pencils:
Black
White
Who this course is for:
- Beginner to Intermediate Colored Pencil Artists
User Reviews
Be the first to review “How To Draw A Realistic Cat Eye In Colored Pencil”
You must be logged in to post a review.



There are no reviews yet.