Realistic Renders in Blender: Adding 3D Models to Images

Learn how to add realistic 3D models to images using Blender and fSpy. Master perspective matching, shadow and reflection formation, and rendering. Perfect for experienced Blender users and motivated beginners. Enhance your interior design skills and create stunning visuals. Free programs used. Start today!
What you’ll learn
- Adding a 3D model to an image.
- Rendering a realistic image.
- Using the fSpy program.
- Adding a 3D model’s shadow and reflection to a surface in a photo.
Learn to add a 3D model to an image! The first step is to get the perspective of the camera in Blender to match the perspective of the actual camera on which the photo was taken. After that, the 3D model and a plane object will be added to the 3D space. The next step is to make the 3D model form a shadow and, if necessary, a reflection on the surface of the plane object so that they appear to be on top of a surface that is in the image. This makes the end result as realistic as possible. Lastly, an image of the view is rendered.
Skills you will learn:
using fSpy to define the right perspective for the camera
forming a shadow on a surface in an image
forming a reflection on a surface in an image
using the node editor in the Compositor window
using rendering layers and collections
rendering the view into an image
This course is meant for 3D artists who already have some experience with Blender, but if you are a motivated beginner, this course is great for you as well. The programs used in the course, ie Blender and fSpy, are free.
The course includes two exercises that will get you familiar with the process. In the first exercise, a 3D model of a clock will be added to a wall in an image so that the clock forms a shadow on its surface. In the second exercise, 3D models of three coffee mugs will be added on top of a glass table in an image so that they will form both a shadow and a reflection on it. To do this they must be rendered in separate rendering layers and after that those layers will be added on top of each other using the node editor in the Compositor window.
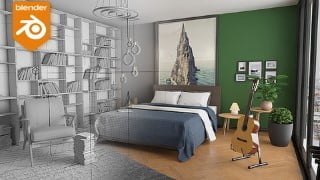
After the course, you can use the skill you have learned to add any 3D models on the surfaces of different kinds of images. This skill is often used, for example, when you want to fill an image of an empty apartment with realistic 3D models of furniture.
Who this course is for:
- slightly experienced Blender users who want to learn Interior Design skills
- motivated beginners who want to learn a little more advanced use of Blender
- those who want to learn how to use fSpy
User Reviews
Be the first to review “Realistic Renders in Blender: Adding 3D Models to Images”
You must be logged in to post a review.


There are no reviews yet.